


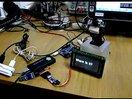
第2步温度传感器的使用
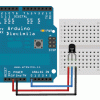
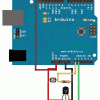
连接温度传感器
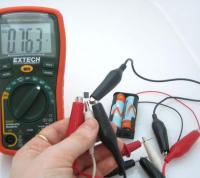
这些传感器有许多小芯片,它们确实需要得到妥善处理。处理时候手指碰到传感器要小心静电,确保电源连接正确,介于2.7——5.5V DC ——所以不要尝试使用9V电池!
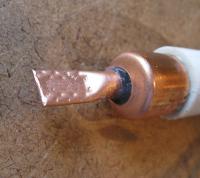
这些TO-92包装的传感器意味着它们的芯片是装在一个塑料模具里并带有三个引脚。可弯曲的引脚容易使传感器连接插入实验电路板。你也可以焊接引脚连接线长。如果您需要传感器能防水,下面可以让你看到我是如何实施一个很好的例子的。
阅读模拟温度数据
不像我们曾经见过的FSR或光电传感器,TMP36和它的“朋友们”表现的并不像一个电阻器。正因为如此,确实只有一种方式从传感器读取温度值——直接将输出引脚塞入ADC插口。

记住,你可以在任何有2.7V—5.5V之间电源提供的地方使用它。在这个例子中,我采用了5V的电源,但提醒一下你也可以采用3.3V电源供电,这和前者一样容易操作。无论你使用哪种电力,模拟电压读数范围都会是0V(接地)——1.75V。
如果您使用的是5V的开源电子原型,并直接将传感器连接到一个模拟引脚,你可以用这些公式将这些10位模拟读数转化为温度:
在引脚电压上的MV=(ADC读数)*(5000/1024)
这个公式通过ADC转换的电压1023读数转换为0-5000mV(= 5V)
如果您使用的是3.3V的Arduino,你将要使用此公式:
引脚电压的MV =(ADC读数)*(3300/1024)
这个公式将ADC上0-1023转换成电压为0-3300mV(= 3.3V)
然后将其毫伏转换为温度,使用这个公式:
摄氏温度= [(模拟电压,以mV为单位) - 500] / 10
简单的温度计
这个ARDUINO的示例代码展示了一个快速的方式去制作一个温度传感器,将它简单代入到有最近Celsius 和 Fahrenheit温度读数的串行端口中。
/TMP36 Pin Variables
int sensorPin = 0; //the analog pin the TMP36's Vout (sense) pin is connected to
                        //the resolution is 10 mV / degree centigrade with a
                        //500 mV offset to allow for negative temperatures

/*
 * setup() - this function runs once when you turn your Arduino on
 * We initialize the serial connection with the computer
 */
void setup()
{
  Serial.begin(9600);  //Start the serial connection with the computer
                       //to view the result open the serial monitor
}

void loop()                     // run over and over again
{
 //getting the voltage reading from the temperature sensor
 int reading = analogRead(sensorPin);

 // converting that reading to voltage, for 3.3v arduino use 3.3
 float voltage = reading * 5.0;
 voltage /= 1024.0;

 // print out the voltage
 Serial.print(voltage); Serial.println(" volts");

 // now print out the temperature
 float temperatureC = (voltage - 0.5) * 100 ;  //converting from 10 mv per degree wit 500 mV offset
                                               //to degrees ((volatge - 500mV) times 100)
 Serial.print(temperatureC); Serial.println(" degrees C");

 // now convert to Fahrenheight
 float temperatureF = (temperatureC * 9.0 / 5.0) + 32.0;
 Serial.print(temperatureF); Serial.println(" degrees F");

 delay(1000);                                     //waiting a second
}
如何获得更好的精度
为了获得更好的效果,请使用3.3V的参考电压AREF,而不是5V,这样将更加精确和降低噪音。
这个来自光线和温度数据储存器教程的例子包括了光电池,但你可以忽略它。

记得使用3.3V引脚作为你的模拟参考,不要忘记在你的设置里指定“模拟参考(EXTERNAL)”在下面的代码中:
/* Sensor test sketch
  for more information see http://www.ladyada.net/make/logshield/lighttemp.html
*/

#define aref_voltage 3.3         // we tie 3.3V to ARef and measure it with a multimeter!


//TMP36 Pin Variables
int tempPin = 1;        //the analog pin the TMP36's Vout (sense) pin is connected to
                        //the resolution is 10 mV / degree centigrade with a
                        //500 mV offset to allow for negative temperatures
int tempReading;        // the analog reading from the sensor

void setup(void) {
  // We'll send debugging information via the Serial monitor
  Serial.begin(9600);

  // If you want to set the aref to something other than 5v
  analogReference(EXTERNAL);
}


void loop(void) {

  tempReading = analogRead(tempPin);

  Serial.print("Temp reading = ");
  Serial.print(tempReading);     // the raw analog reading

  // converting that reading to voltage, which is based off the reference voltage
  float voltage = tempReading * aref_voltage;
  voltage /= 1024.0;

  // print out the voltage
  Serial.print(" - ");
  Serial.print(voltage); Serial.println(" volts");

  // now print out the temperature
  float temperatureC = (voltage - 0.5) * 100 ;  //converting from 10 mv per degree wit 500 mV offset
                                               //to degrees ((volatge - 500mV) times 100)
  Serial.print(temperatureC); Serial.println(" degrees C");

  // now convert to Fahrenheight
  float temperatureF = (temperatureC * 9.0 / 5.0) + 32.0;
  Serial.print(temperatureF); Serial.println(" degrees F");

  delay(1000);
}猜你会喜欢

世界上最小的DS18B20温度计
DS18B20不少朋友都用过吧,不过似乎...

iPhone控制的简易物联网
这次我尝试制作一个简单的物联网系统,可以...
基于MK802的摄像头自动光源跟踪
基于MK802的摄像头自动光源跟踪,展示...

用Android和Arduino控制门锁
这次我制作一个简易的无线控制门锁,实现用...
Arduino加速度传感器与幻彩立方的互动
这篇文章介绍MM7361三轴加速度传感器...
评 论
选择昵称后请轻按空格键
请勿进行人身攻击,谩骂以及任何违法国家相关法律法规的言论。